


Read Full Post
 Apologies for the delay in posting the winners from the Holiday Decorations assignment. Over the Christmas holiday our servers decided that they deserved a break, so we were experiencing some technical difficulties. However, without further delay we have the winners for Holiday Decorations. Our winner this week was Obijuan’s “My Pretty Ball”. This one stood out to us. While it was one of many ornament shots, the use of the light trails around the ornament was different from the usual. Our first runner up was CallMeJag’s “Christmas Bokeh”. Shaped bokeh gets pretty popular around Christmas, but it can be difficult to make it look good. This shot was simple, and the colours worked well. And although the bokeh was the subject, in this case it worked because of the clarity of the shapes and the bold red. And last, but not least was TravisRichins‘ single ornament. Again, it’s a nice simple shot. The reflection helps add interest, and it was bright, cheerful, and colourful. Well done everyone!

Post from: Digital Photography School


Do you want to know how to photograph fireworks? With 4th July just days away I thought I’d refresh this article in which I give 10 Fireworks Photography tips to help you get started.
Fireworks Displays are something that evoke a lot of emotion in people as they are not only beautiful and spectacular to watch but they also are often used to celebrate momentous occasions.
I’ve had many emails from readers asking how to photograph fireworks displays, quite a few of whom have expressed concern that they might just be too hard to really photograph. My response is always the same – ‘give it a go – you might be surprised at what you end up with’.
My reason for this advice is that back when I bought my first ever SLR (a film one) one of the first things I photographed was fireworks and I was amazed by how easy it was and how spectacular the results were. I think it’s even easier with a digital camera as you can get immediate feedback as to whether the shots you’ve taken are good or not and then make adjustments.
Of course it’s not just a matter of going out finding a fireworks display – there are, as usual, things you can do to improve your results. With 4 July just around the corner I thought I’d share a few fireworks digital photography tips:
Get more Digital Photography Tips like this in your email with our free newsletter
Perhaps the most important tip is to secure your digital camera to something that will ensure it doesn’t move during the taking of your shots. This is especially important in photographing fireworks simply because you’ll be using longer shutter speeds which will not only capture the movement of the fireworks but any movement of the camera itself. The best way to keep your camera still is with a tripod (read our series on tripods and how to use and buy them). Alternatively – keep in mind that there are other non Tripod options for beating camera shake.
One way to ensure your camera is completely still during fireworks shots is to invest in a remote release device. These will vary from camera to camera but most have some sort of accessory made for them. The other way of taking shots without touching your camera is to use the self timer. This can work but you really need to be able to anticipate shots well and its very very hit and miss (read more on remote shutter releases).
One of the most difficult parts of photographing fireworks is working out where to aim your camera. The challenge you’ll face in doing this is that you generally need to aim your camera before the fireworks that you’ll be photographing goes off – anticipation is key. Here are a few points on getting your framing right.
Scope out the location early – Planning is important with fireworks and getting to the location early in order to get a good, unobstructed position is important. Think about what is in the foreground and background of your shots and make sure you won’t have people’s heads bobbing up into your shots (also consider what impact you’ll have on others around you also). Take note of where fireworks are being set up and what parts of the sky they are likely to be shot into – you might also want to try to ask some of those setting up the display for a little information on what they are planning. Also consider what focal lengths you might want to use and choose appropriate lenses at this time (rather than in the middle of the show).Watch your Horizons - One thing that you should always consider when lining up fireworks shots is whether your camera is even or straight in it’s framing. This is especially important if you’re going to shooting with a wide focal length and will get other background elements in your shots (ie a cityscape). Keeping horizons straight is something we covered previously on this site and is important in fireworks shots also. As you get your camera on your tripod make sure it’s level right from the time you set up.Vertical or Horizontal? – There are two main ways of framing shots in all types of photography, vertically (portrait) or horizontally (landscape). Both can work in fireworks photography but I personally find a vertical perspective is better – particularly as there is a lot of vertical motion in fireworks. Horizontal shots can work if you’re going for more of a landscape shot with a wider focal length of if you’re wanting to capture multiple bursts of fireworks in the one shot – but I don’t tend to go there that often.Remember your framing – I find that when I photograph fireworks that I spend less time looking in my viewfinder and more looking at the sky directly. As a result it’s important to remember what framing you have and to watch that segment of the sky. Doing this will also help you to anticipate the right time for a shot as you’ll see the light trails of unexploded rockets shooting into the sky.One of the hardest parts of photographing fireworks is having your camera trained on the right part of the sky at the right time. This is especially difficult if you’re shooting with a longer focal length and are trying to take more tightly cropped shots. I generally shoot at a wider focal length than a tight one but during a show will try a few tighter shots (I usually use a zoom lens to give me this option) to see if I can get lucky with them. Of course zoomed in shots like the one to the left can be quite effective also. They enable you to really fill the frame with great color. Keep in mind however that cropping of your wider angle fireworks shots can always be done later to get a similar impact in your photography.
A common question around photographing fireworks displays is what aperture to use. Many people think you need a fast lens to get them but in reality it’s quite the opposite as the light that the fireworks emit is quite bright. I find that apertures in the mid to small range tend to work reasonably well and would usually shoot somewhere between f/8 to f/16.
Probably more important to get right than aperture is shutter speed. Fireworks move and as a result the best photographs of them capture this movement meaning you need a nice long exposure. The technique that I developed when I first photographed fireworks was to shoot in ‘bulb’ mode. This is a mode that allows you to keep the shutter open for as long as you hold down the shutter (preferably using a remote shutter release of some type). Using this technique you hit the shutter as the firework is about to explode and hold it down until it’s finished exploding (generally a few seconds).
You can also experiment with set shutter speeds to see what impact it will have but I find that unless you’re holding the shutter open for very long exposures that the bulb technique works pretty well.
Don’t keep your shutter open too long. The temptation is to think that because it’s dark that you can leave it open as long as you like. The problem with this is that fireworks are bright and it doesn’t take too much to over expose them, especially if your shutter is open for multiple bursts in the one area of the sky. By all means experiment with multiple burst shots – but most people end up finding that the simpler one burst shots can be best.
Shooting at a low ISO is preferable to ensure the cleanest shots possible. Stick to ISO 100 and you should be fine.
Shooting with a flash will have no impact upon your shots except to trick your camera into thinking it needs a short exposure time. Keep in mind that your camera’s flash will only have a reach of a few meters and in the case of fireworks even if they were this close a flash wouldn’t really have anything to light except for some smoke which would distract from the real action (the flashing lights).Switch your flash off.
I find I get the best results when shooting in manual exposure and manual focus modes. Auto focusing in low light can be very difficult for many cameras and you’ll end up missing a lot of shots. Once your focusing is set you’ll find you don’t really need to change it during the fireworks display – especially if you’re using a small aperture which increases depth of field. Keep in mind that changing focal lengths will mean you need to need to adjust your focusing on most lenses.
Throughout the fireworks display periodically check your results. I generally will take a few shots at the start and do a quick check to see that they are OK before shooting any more. Don’t check after every shot once you’ve got things set up OK (or you’ll miss the action) but do monitor yours shots occasionally to ensure you’re not taking a completely bad batch.
Also experiment with taking shots that include a wider perspective, silhouettes and people around you watching the display. Having your camera pointed at the sky can get you some wonderful shots but sometimes if you look for different perspectives you can get a few shots that are a little less cliche and just as spectacular. Most of the best shots that I’ve seen in the researching of this article have included some other element than the fireworks themselves – whether it be people, buildings, landmarks or wider cityscape perspectives.
“Find Out the Direction of the Wind – You want to shoot up wind, so it goes Camera, Fireworks, Smoke. Otherwise they’ll come out REALLY hazy.”“Also, I find that if you shoot from a little further back and with a little more lens, you can set the lens to manual focus, focus it at infinity and not have to worry about it after that.”“Remember to take advantage of a zero processing costs and take as many pictures as possible (more than you’d normally think necessary). That way, you’ll up your chances of getting that “perfect” shot.”“Make sure you are ready to take pictures of the first fireworks. If there isn’t much wind, you are going to end up with a lot of smoke in your shot. The first explosions are usually the sharpest one.”“Get some black foam core and set your camera to bulb. Start the exposure when the fireworks start with the piece of foam core in front of the lens. Every time a burst happens move the foam core out of the way. You will get multiple firework bursts in one exposure”“Another tip I would add to this is pre-focus if possible (need to be able to manually focus or lock down focus for good) before the show starts so other elements in the frame are sharp They did mention that you only need to focus once but its a lot easier to take a few shots before the show starts and check them carefully rather than wait until the show has begun and you are fiddling with focus instead of watching fireworks!”Tell us your fireworks display photography tips in comments below. Don’t forget to tell us which city you’re in and what the fireworks are like there!
We post tutorials like this every day – Get more via email with our free weekly newsletter.
PS: Got some fireworks photos to share with us? Head over to our forum where there are a few fireworks photography discussions taking place.
Apologies for the delay in posting the winners from the Holiday Decorations assignment. Over the Christmas holiday our servers decided that they deserved a break, so we were experiencing some technical difficulties. However, without further delay we have the winners for Holiday Decorations. Our winner this week was Obijuan’s “My Pretty Ball”. This one stood out to us. While it was one of many ornament shots, the use of the light trails around the ornament was different from the usual. Our first runner up was CallMeJag’s “Christmas Bokeh”. Shaped bokeh gets pretty popular around Christmas, but it can be difficult to make it look good. This shot was simple, and the colours worked well. And although the bokeh was the subject, in this case it worked because of the clarity of the shapes and the bold red. And last, but not least was TravisRichins‘ single ornament. Again, it’s a nice simple shot. The reflection helps add interest, and it was bright, cheerful, and colourful. Well done everyone!

 We also started (and continued) our Holiday Food assignment. Because of the forum problems, this assignment has been extended for a week and now runs from 15 December 2010 – 5 January 2011. So if you haven’t gotten your entries in, you’ve still got time! As always, a quick reminder of the rules. First, your photo needs to have been taken between 15 December 2010 – 5 January 2011. Second, your post must include the words “Assignment: Holiday Food” and the date the photo was taken in order to show that it is eligible for the contest. Finally, your EXIf should be intact, and it’s useful if you can include some of the main points such as camera, lens, shutter speed, aperture, ISO, etc. Our next assignment will be “Best of the Year”. For this upcoming assignment we want you to pick what you think is your best shot from 2010 and share it with us. Maybe it’s one of your assignment photos, maybe it’s a photo that you took that you’re incredibly proud of. Whatever it is, don’t forget to enter your best in our next assignment.
Nicole is a DPS Forum moderator and keen photographer from New Zealand. See her blog and Flickr account.

One feature that I (along with a lot of other users) would like to see built into Lightroom is a calendar template. Unfortunately, there is not one available but thanks to Jerry Courvoisier of www.lightroomworkshops.com, for 2011 at least, you can download and create CD jewel case calendars for 2011.

To get started visit http://www.lightroomworkshops.com/tutorials.html and download the large zip file which contains everything that you need. It’s called Calendars for Custom Print Module and it works with Lightroom 3 only.
The zip file contains not only the print presets for creating the calendar pages but also the calendar images and a movie that explains how to get everything working.
Once you’ve downloaded the file, unzip its contents and open up Lightroom.
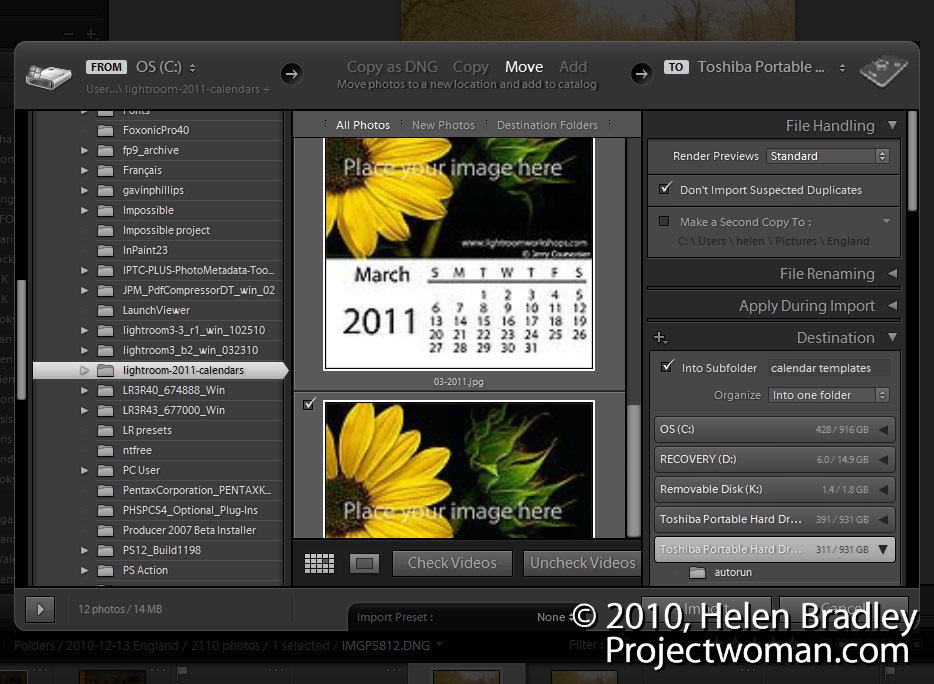
Start by importing the 12 jpeg calendar images into Lightroom. Choose File > Import Photos and browse to locate your downloads folder and the Lightroom 2011 Calendar subfolder that the files will have been unzipped into.
Select all twelve calendar pages, create a folder for them inside Lightroom and import them.
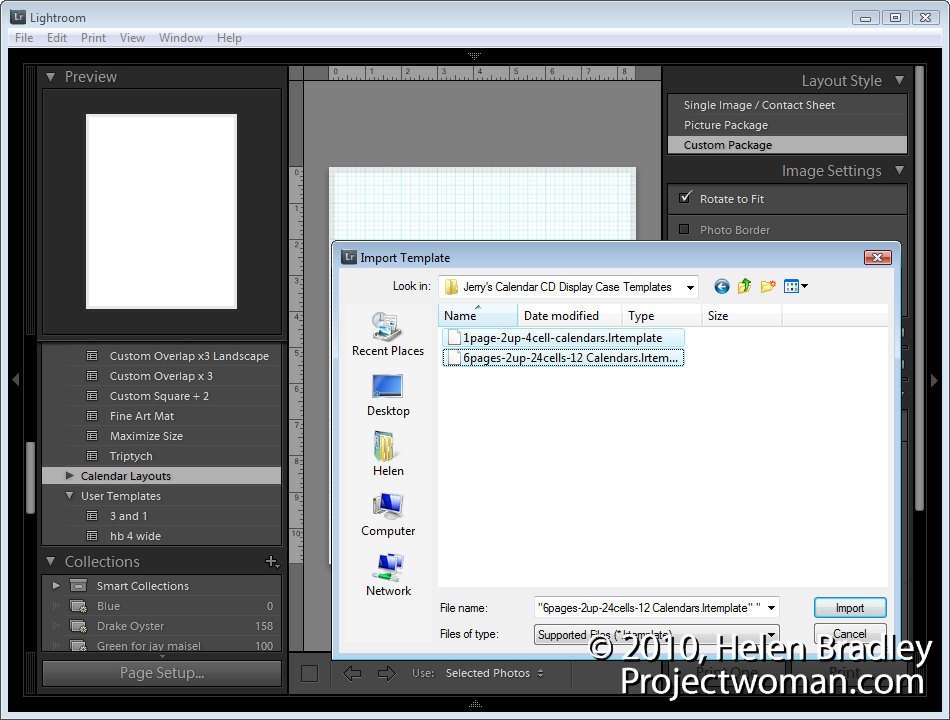
Open the Print module. Locate and open the Template Browser panel and right click the Lightroom Templates folder. Click New Folder and create a folder for the calendar page layouts – CD Calendar Layouts is a good name to use. Right click this folder, choose Import and go ahead and import the two .lrtemplate files from the package of unzipped files.

Switch to the Library module and create a new collection containing all the 12 calendar page images you just imported and 12 images to use for your calendar. Each image should be cropped using the Crop tool in the Develop Module tools to a size of 4.65 in wide by 3.5 in tall. (In his video Courvoisier suggests you crop to 4 x 3 but the actual cell sizes used are 4.65 x 3.5in). You can create a custom crop size to use.
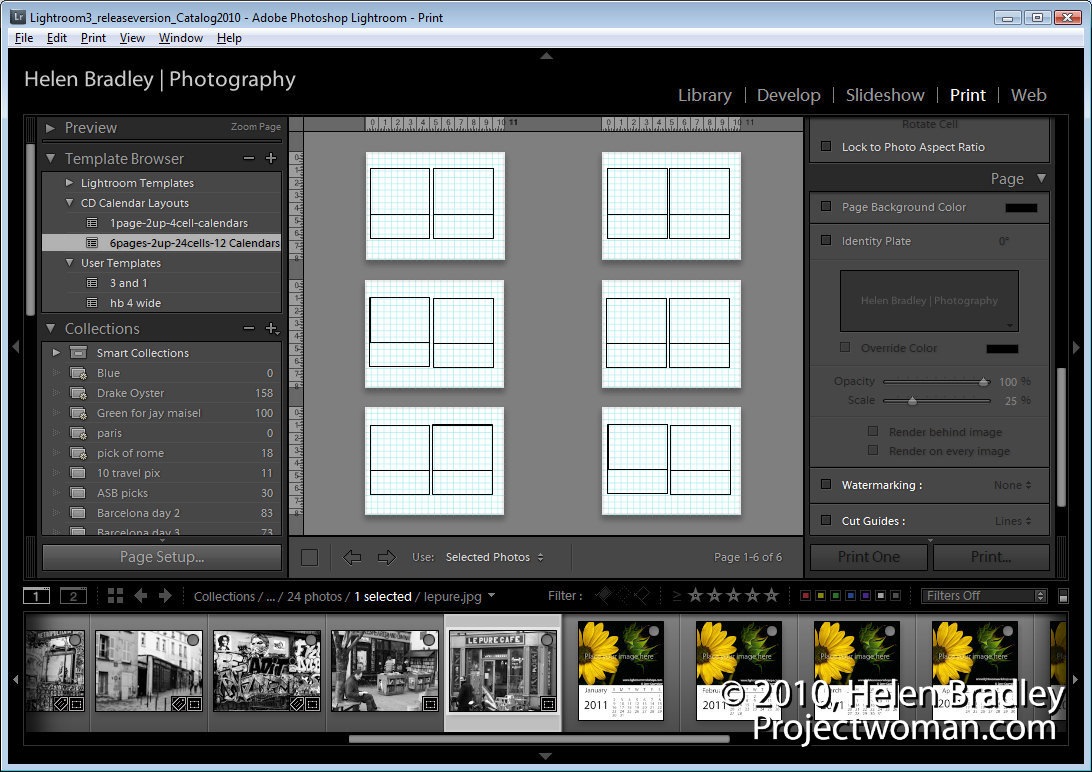
With the collection selected, return to the Print module, click Page Setup and set the paper to Letter, Landscape orientation.
Select the 6pages-2up-24cells-12calendars template.
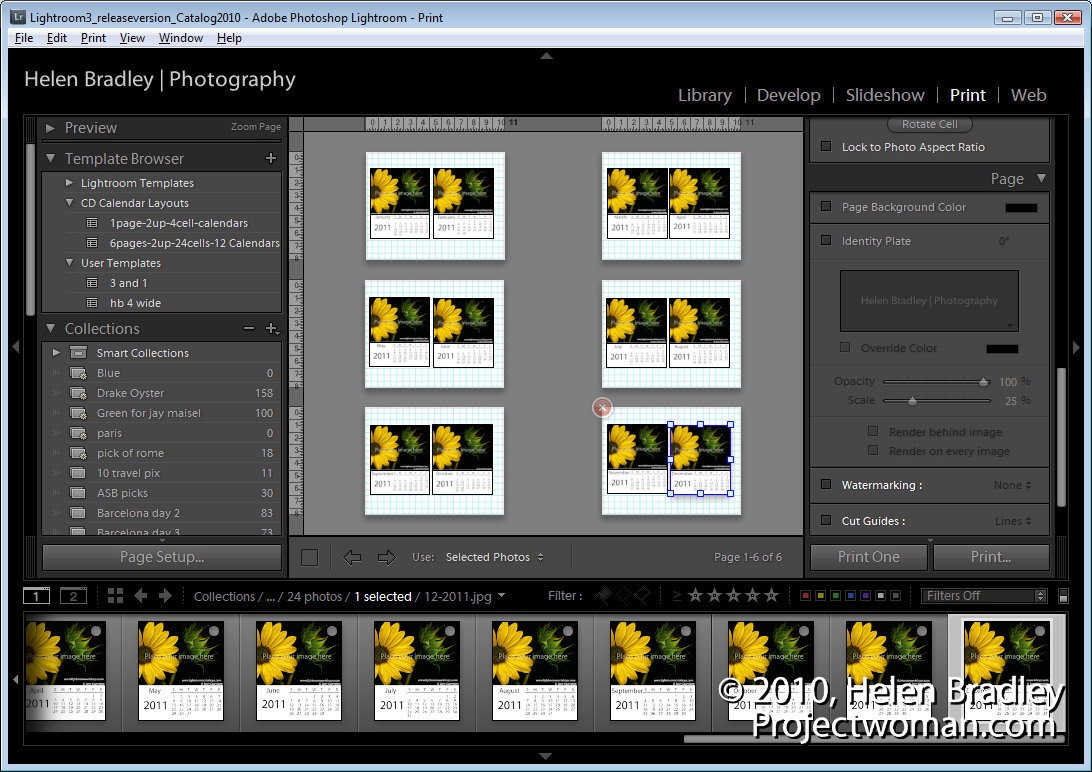
To create the pages, drag and drop one calendar page into each of the larger picture placeholders in the template. If the page doesn’t into the right box, select Edit > Undo and try again. You’ll need to have the calendar pages in position before placing the images into the pages.
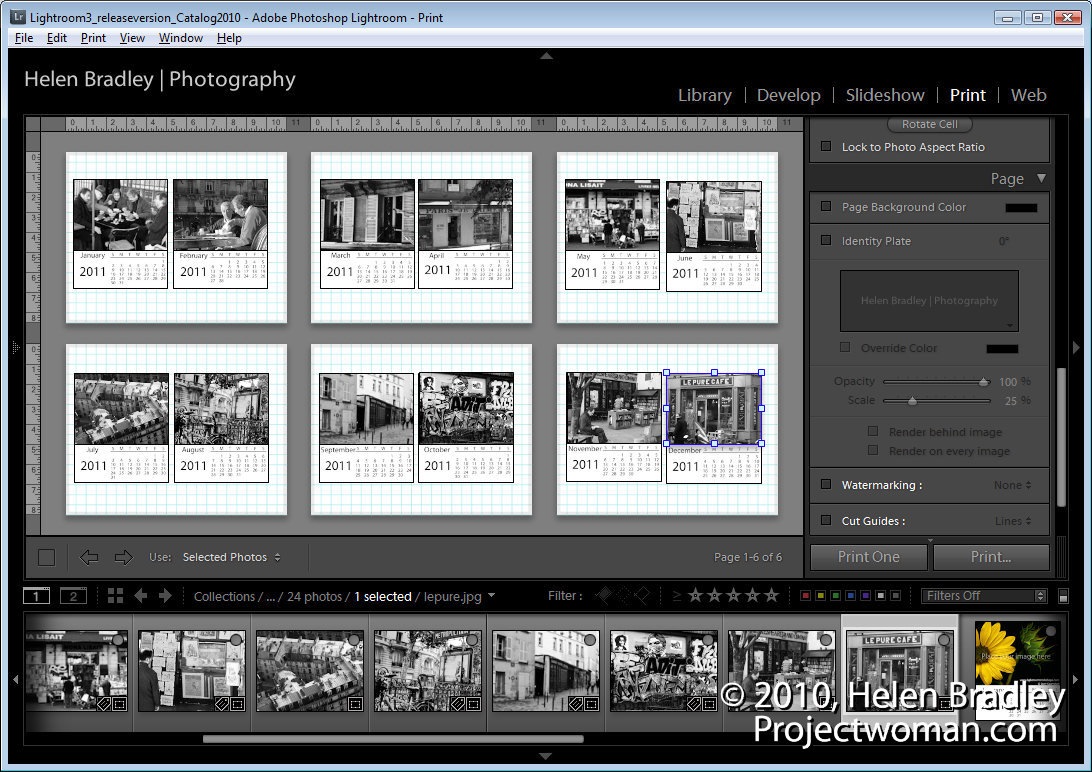
Now drag and drop the images into the smaller image placeholders for each calendar page.
Once you’ve assembled the pages it’s simply a case of printing them using the print options and them assemble the pages by trimming them to size and placing the images inside a CD case.
You can reverse engineer the project to create your own calendar pages at any size. To do this, you’ll need to create a calendar in a program such as Photoshop and save it as a high quality JPG image. This will become the basic calendar page and over the top of that you can insert your calendar image. For a one month to a page you’ll need 12 calendar pages or you can create a full year calendar on a page with space for an image. Better still, if you have access to a program that will create the calendars for you and that lets you save the pages as jpeg or png images – use that. Microsoft Publisher is one such program that would work.
Helen Bradley is a Lifestyle journalist who divides her time between the real and digital worlds, picking the best from both. You can view her site at helenbradley.com. She writes and produces video instruction for Photoshop and digital photography for magazines and online providers world wide. She has also written four books on photo crafts and blogs at Projectwoman.com.

The Samsung WB700 is a new travel-zoom camera with an 18x optical zoom lens.


A number of readers emailed to ask which of the products I most recommend. It was a tricky question to answer as we purposely chose 12 deals that we genuinely recommend – each to appeal to different people.
So in an attempt to answer the question I decided to compile the 11 deals in order of popularity with our readers (based upon the feedback from our partners on how many items they sold. Of course this doesn’t mean those at the top of the list are necessarily better products – the deals just appealed to more people (due to factors like price, the discount amount, which day of the week each deal was released etc).
In fact to illustrate this the last item on the list (the software from onOne) has generated more positive feedback to me than many of the others in the list despite lower sales numbers).
Anyway – if you’re looking for some photography bargains to kick you into gear for 2011 – this is your last chance. Here’s the list:
Post from: Digital Photography School


